
The Ultimate Trailer Parts Replacement Guide
So, you need to replace worn-out parts on your trailer? Don't worry, this is common. Whether it's due to wear and tear, damage, or you simply want an upgrade, CURT has the replacement trailer parts you need to maintain your trailer and ensure it's functioning at its best for the road ahead.
From trailer couplers and latches to safety chains and trailer jacks, we've got you covered and have a full, comprehensive offering of replacement parts and accessories for your trailer.
In this guide, we will explain what trailer replacement parts are and also explain what the different parts of a trailer are used for. Follow along below!
Parts of a Trailer Diagram

- Coupler
- Jack
- Tongue
- Frame / Chassis
- Tie-Down Anchors
- Fenders
- Gate
- Taillights
- Axle Assembly
- Wheels
- Bed
- Side Walls
- Side Marker Lights
- Safety Chains
- Wiring Harness
Repairing or Replacing Your Trailer Coupler
When it comes to trailer maintenance, the coupler plays a vital role in ensuring safe and secure towing. Over time, wear and tear can compromise its reliability, making it essential to inspect and replace the coupler as needed. Whether you’re dealing with rust, a faulty latch, or simply upgrading for added safety, understanding how to properly repair or replace your trailer coupler is key to keeping your rig roadworthy and your hauls worry-free.
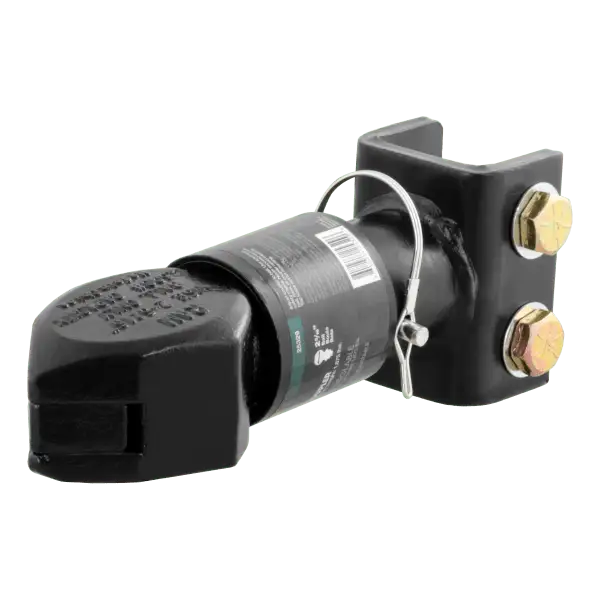
What is the Trailer Coupler Exactly?
A trailer coupler attaches to the tongue of the trailer and securely latches onto the tow vehicle's hitch ball.
This connection is essential for towing and provides stability and safety. It plays a crucial role in maintaining a firm attachment between the trailer and the tow vehicle, ensuring that the hitch ball remains securely in place while the vehicle is in motion.
Most trailer couplers are made up of a cup or receiver component to accept the hitch ball, a body component that attaches to the trailer as well as a latching mechanism to secure the coupler onto the ball.

Some Common Types of Trailer Couplers
The first step in repairing or replacing a trailer coupler is identifying the specific type you have, as different couplers are designed for various trailer sizes, weights, and towing needs.

Straight-Tongue
Straight-tongue couplers, commonly used for lighter loads like boat and utility trailers, bolt directly to a single steel square tube frame, offering reliable connections but with limited pivot range, making them less ideal for heavier towing applications.

A-Frame
A-frame couplers, commonly used for towing travel trailers, larger utility trailers, and commercial trailers, feature a triangular design that bolts or welds to the front frame rails, providing stability by evenly distributing towing forces and improving turning by reducing the distance between the trailer and tow vehicle.
Channel-Style
Channel-style couplers offer adjustable height by allowing the coupler body to move within a channel, making them ideal for towing trailers with multiple vehicles of varying sizes, though they require careful adjustment to ensure a secure fit.
Lunette Ring
Lunette rings, designed for heavy-duty towing in agricultural, industrial, or military applications, are a more specialized type of coupler that is designed to pair with a pintle hitch to handle payloads up to 60,000 lbs, offering extra articulation and movement for towing over rough terrain.

Coupler Opening Size
Trailer couplers are designed to match specific trailer ball diameters, which ensures a secure and proper fit for towing. The most common coupler sizes correspond to three standard trailer ball diameters: 1-7/8", 2", and 2-5/16".
A 1-7/8" coupler is typically used for lighter loads, such as small utility or boat trailers. The 2" coupler is the most widely used, supporting a variety of medium-duty trailers like utility, boat, and camper trailers. For heavy-duty applications, the 2-5/16" coupler accommodates larger trailers and is a common choice for commercial use.
It’s important to match the trailer ball and coupler size correctly to ensure safe and stable towing.

Bolt-on vs. Weld-on Coupler Installation
Before replacing a trailer coupler, it's important to identify whether the existing one is bolt-on or weld-on. A bolt-on coupler is attached with bolts, making it easier to remove and replace, which makes it a good option for DIY repairs. This type is more accessible for users who want to handle the replacement themselves.
On the other hand, a weld-on coupler is permanently welded to the trailer frame, providing higher strength and durability but requiring professional welding for installation. If your trailer has a weld-on coupler, you may need to seek professional help for a proper, secure replacement.
Trailer Coupler Parts
A typical trailer coupler consists of several key components that work together to ensure a secure connection between your trailer and tow vehicle. Below is a list of the common components found in most trailer couplers:
- Coupler body: The main housing that connects to the trailer tongue.
- Latch or locking mechanism: Ensures the coupler stays securely attached to the trailer ball.
- Hinge pin or pivot: Allows the latch to move up and down for attachment and release.
- Adjustment nut: Allows fine-tuning to ensure a snug fit around the trailer ball.
- Safety pin: Secures the latch to prevent accidental disengagement during towing.

Replacing the Trailer Latch
A trailer coupler latch locks the trailer hitch ball into the trailer coupler. It completes the function of the trailer coupler by preventing the trailer ball from leaving the coupler, and it's essential for safe towing.
If your latch becomes rusty or damaged, you may be able to replace it without needing to replace the entire coupler.
Latch designs vary in both form and functionality, and there are many different types. Posi-lock and easy-lock latches are most common and are compatible with many trailer types. No-latch systems, such as CURT QuickPin™ couplers, are designed for ease and convenience, allow for swift coupling and decoupling using just a hitch pin.
Some Common Coupler Latch Types

Posi-Lock Latch

Easy-Lock Latch

Sleeve-Lock Latch
What is a latch-free coupler?
CURT QuickPin™ couplers simplify coupling and give you confidence by reducing the chances of an improper latch. The latch-free design features a single pin to secure the tongue onto the ball.
These no-latch trailer couplers have no moving or mechanical parts and are available in multiple sizes to fit most existing trailer bolt-hole patterns.
Replacing Coupler Hardware
A typical trailer coupler consists of several key components that work together to ensure a secure connection between your trailer and tow vehicle. Below is a list of the common components found in most trailer couplers:
- Coupler body: The main housing that connects to the trailer tongue.
- Latch or locking mechanism: Ensures the coupler stays securely attached to the trailer ball.
- Hinge pin or pivot: Allows the latch to move up and down for attachment and release.
- Adjustment nut: Allows fine-tuning to ensure a snug fit around the trailer ball.
- Safety pin: Secures the latch to prevent accidental disengagement during towing.
Trailer Jack
Trailer jack definition: A trailer jack is a mechanical device that is used to raise and lower the trailer, facilitating hitching and unhitching to a tow vehicle.
A trailer jack is typically mounted on the trailer's tongue and can be operated manually or electrically.
There are several types of trailer jacks, which range from simple swivel jacks and marine jacks, to A-frame jacks an direct-weld square jacks.
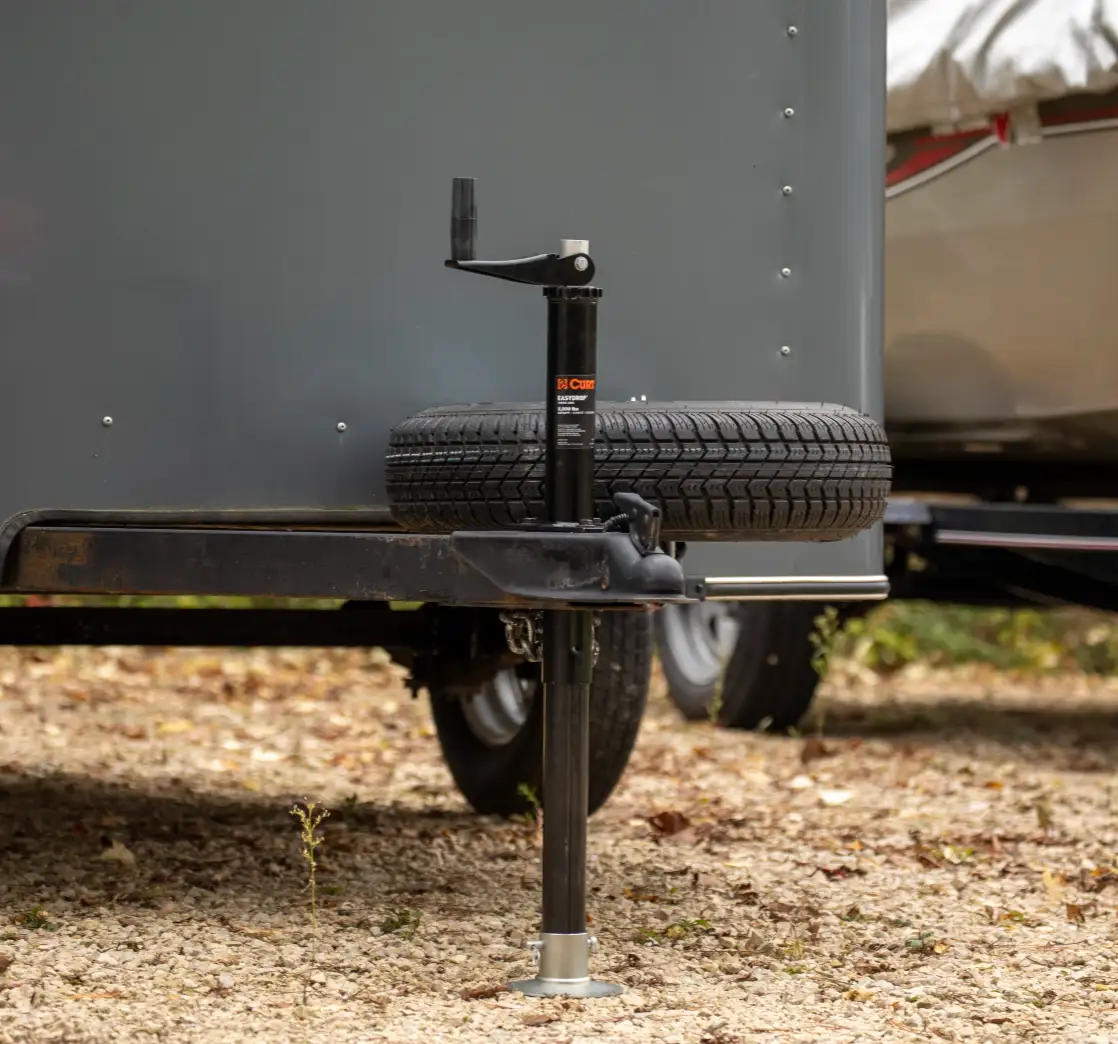
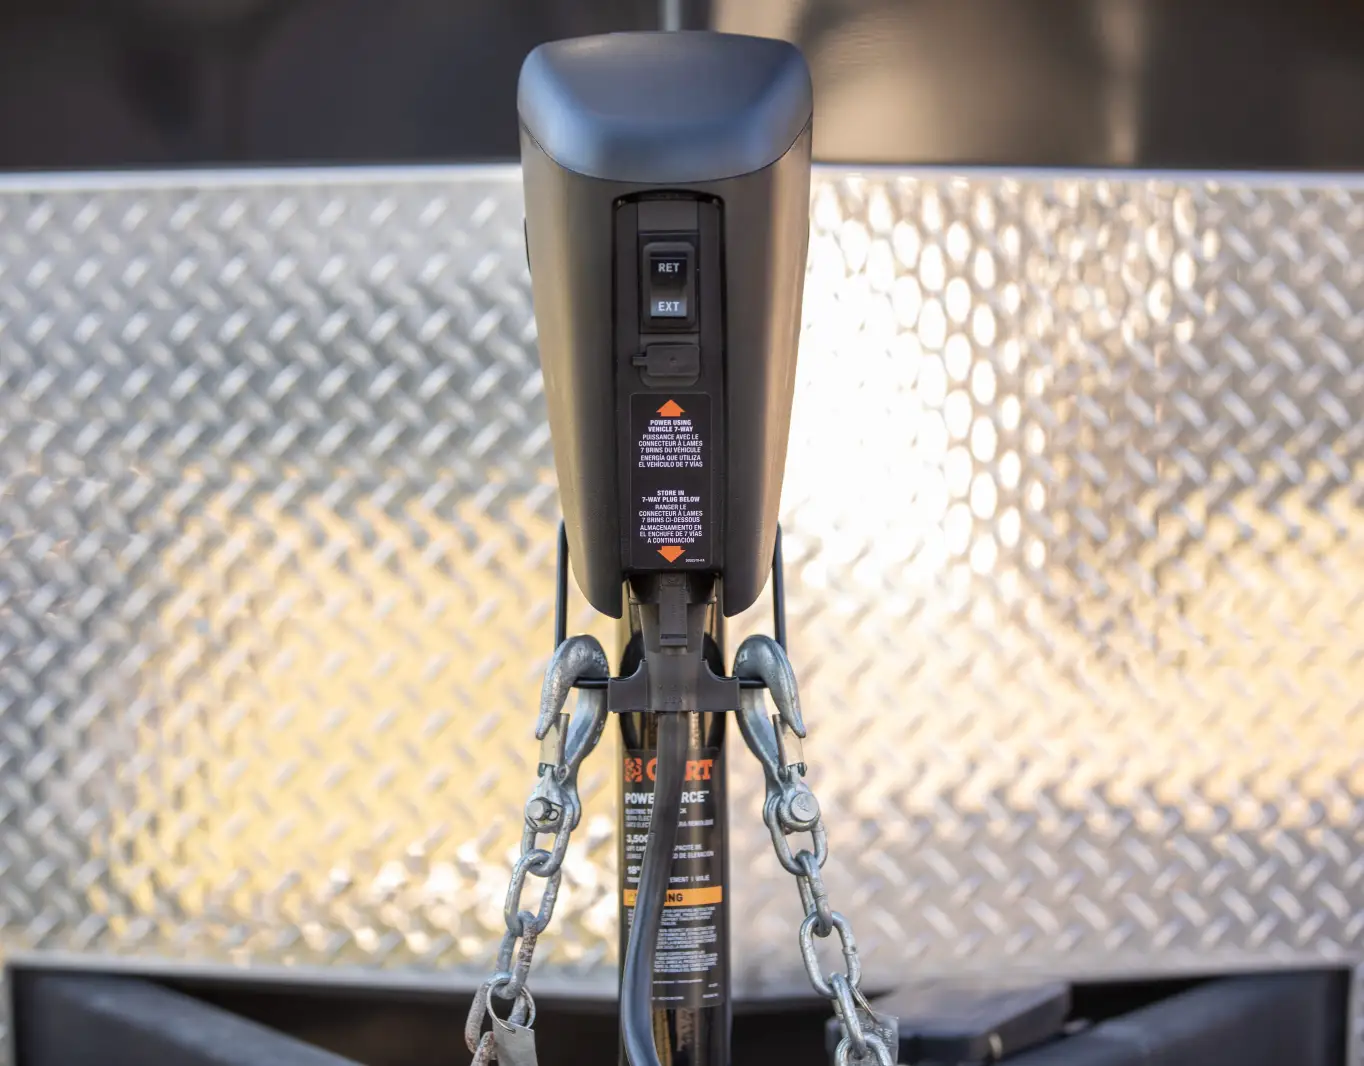
What is an electric trailer jack?
An electric trailer jack can transform your hitching experience. Standard trailer jacks are operated manually and hold up the trailer which can have an immense amount of weight.
This means hand-cranking a trailer jack can be quite cumbersome — the handle may need to be fully turned dozens of times to fully raise or lower your trailer.
The electric trailer jack peforms this task for you and makes lowering and hitching your trailer a breeze. Simply push the raise or lower button and the electric jack will take care of the rest, ensuring your towing experience is simple and smooth.
Trailer Jack Replacement
Step 1: Elevate the Trailer Frame
Begin by ensuring your trailer is on flat ground and the wheels are blocked. Use a floor jack (not the tongue jack) to elevate the trailer frame and stabilize it with appropriate jack stands under the frame.
Step 2: Detach the Jack Foot or Wheel
If your jack includes a foot or wheel at the base, remove this before taking off the entire jack assembly. These parts are typically secured with a basic safety or cotter pin with a clip. Detach this and keep it aside.
Step 3: Unfasten the Bolts or Cut the Welds
Jacks are usually attached to the trailer with standard nuts and bolts. On A-frame jacks, bolts are inserted through the mounting bracket vertically, while on swivel-style jacks, the hardware might be horizontal. Lightweight jacks might use U-bolts.
For welded jacks, cut the welds using an angle grinder or a similar tool. If uncertain, seek professional assistance.
After removing the hardware or welds, take off the old jack and put it aside.
Step 4: Prep the Mounting Area
Trailers often accumulate dirt due to exposure to the elements and the road. Clean the area where the new jack will be mounted. For light dust, a simple wipe with a cloth suffices. For surface rust, consider a more thorough cleaning with abrasives or touch-up paint.
Avoid painting any areas designated for welding.
Step 5: Install the New Jack
Place the new jack on the trailer frame and secure it with the right hardware. Ensure all hardware is correctly torqued, starting with hand-tightening before achieving final torque specifications.
For jacks requiring welding, professional installation is advised.
Step 6: Reattach the Jack Foot or Wheel
Put back the foot or wheel on your new jack's bottom. Note that some jacks may not accommodate these accessories, while others might include them.
Step 7: Test the Installed Jack
Once the jack is firmly fixed, use your floor jack to lift the trailer frame again and remove the jack stands. This returns the trailer to its regular position. Before towing or hitching, test the new jack by repeatedly raising and lowering it to ensure proper function.


Trailer Jack Replacement Parts
CURT offers a full line-up of trailer jack replacement parts and accessories that vary from replacement hand cranks, wheels, swivels, bearings, foot pads, lift nuts, gears, and more.
These parts and pieces are vital for a smoothly functioning trailer jack. Replacing your CURT trailer jack is always an option, however, using OEM CURT trailer jack replacement parts can help to replace worn-out parts and prevent the need to replace the entire jack itself.

Trailer Axle Parts
Trailer axle parts vary from brake assemblies and suspension parts to axle bearings, dust covers, wheel hubs, shock assemblies, leaf springs, and hardware.
Protect your vehicle with robust trailer axle components built to endure the challenges of outdoor adventures in your RV.
CURT's extensive collection of RV suspension enhancements features sought-after systems such as Equa-Flex and Road Armor, alongside air suspension alternatives.
We provide essential trailer axle replacement parts, including trailer shocks, axle hanger brackets, and other crucial installation or repair hardware.


Why is it important to replace trailer axle parts?
Trailer axle parts wear when traveling in your RV and are important to replace to prevent further issues down the road.
Replacing your worn trailer axle parts prevents your RV from deteriorating and degrading and maintaining your RV ensures that all parts and systems are working as they are intended.
RVs that have proper maintenance will uphold their value while staying safe and dependable.
Complete Trailer Axle Replacement
Step 1: Jack Up Trailer
Use a floor jack to lift the trailer by its frame, ensuring stability with jack stands for safety.
Step 2: Remove the Wheels
Unbolt lug nuts using a tool like an impact driver and remove the wheels, setting them aside.
Step 3: Cut Wires (If Applicable):
For electric brake axles, cut the power and ground wires to avoid damage during axle removal.
Step 4: Lift Axle
Elevate the axle with the floor jack, placing jack stands underneath for support.
Step 5: Remove the Shackles
Detach shackles from the leaf springs, checking for wear and tear.
Step 6: Remove Hanger Bolts
Unfasten the bolts that secure leaf springs to the hangers, inspecting for necessary replacements.
Step 7: Lower Axle
Carefully lower and remove the old axle from under the trailer.
Step 8: Install New Axle
Position the new axle under the trailer, aligning it correctly before lifting into place.
Step 9: Attach Leaf Springs
Reattach leaf springs using bolts, ensuring proper alignment and lubrication.
Step 10: Torque Bolts
Securely tighten all bolts to the manufacturer's specified torque.
Step 11: Reconnect Brake Wires
Rejoin brake power and ground wires using appropriate connectors.
Step 12: Reinstall Wheels
Place wheels back on, hand-tighten lug nuts, then use a torque wrench for final tightening.


Wheel Bearing Protectors
Definition: a trailer wheel bearing protector covers the wheel hub. Wheel bearing protectors act like a shield for your wheel bearings and serve two crucial roles. They guard the wheel bearings against water, dirt, and road debris and supply a continuous grease supply for smooth wheel rotation.
Neglected, dirty, or wet wheel bearings can cause noise, vibration, and reduce economy while overheating and escalating from a minor nuisance to a major issue rapidly.
CURT's wheel bearing protectors ensure silent and efficient wheel movement and prevent bearing breakdown, which can lead to an accident.

Step 1: Remove the Wheel:
Jack up the trailer using a floor jack under the frame.
Secure the trailer with chocks and lift until the tire is off the ground.
Use a jack stand for extra support.
Remove lug nuts with an impact driver or ratchet and take off the wheel.
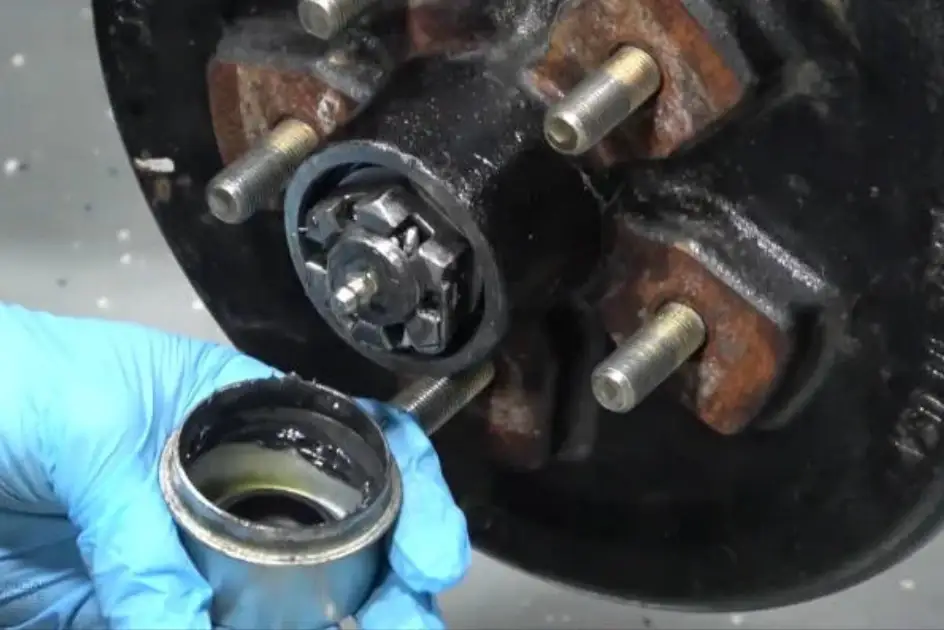
Step 2: Remove the Dust Cap:
Pry off the dust cap from the hub with a flathead screwdriver.
Step 3: Remove the Spindle Nut:
Remove the cotter pin from the castle nut in the hub center with pliers.
Unscrew the spindle nut using an impact driver.
Step 4: Remove the Hub:
Take off the washer, then slide the hub off the spindle.
Catch any loose bearings.
Step 5: Inspect the Brake Assembly:
Examine brake components like shoes and springs.
Clean any grease from the magnet, shoes, and spindle.
Step 6: Install the New Hub:
Press the new hub onto the spindle.
Install the outer bearing and washer.
Finger-tighten the castle nut, then torque it.
Back off the nut and retighten by hand.
Secure with a new cotter pin.
Step 7: Replace the Dust Cap:
Tap the dust cap into place on the hub with a rubber mallet.
Step 8: Reattach the Wheel:
Put the wheel back on and finger-tighten lug nuts.
Tighten nuts with a wrench or impact driver in a star pattern.
Lower the trailer and torque the nuts.
Check lug nut torque after 10, 25, and 50 miles.


Trailer Wheel Chocks
Wheel chocks are simply wedges that are placed on each side of the trailer wheel when parked and not in use. Wheel chocks are important for safety to have on hand anytime you are towing or traveling with a trailer. This is because once the trailer is parked and unhitched from the vehicle, there is nothing to stop the trailer from rolling.
This is where wheel chocks play an important role — they secure the trailer, prevent it from moving, and stop the trailer from becoming mobile and crashing into another vehicle or person.
Wheel chocks also help to protect your belongings inside the trailer by preventing movement and shifting.
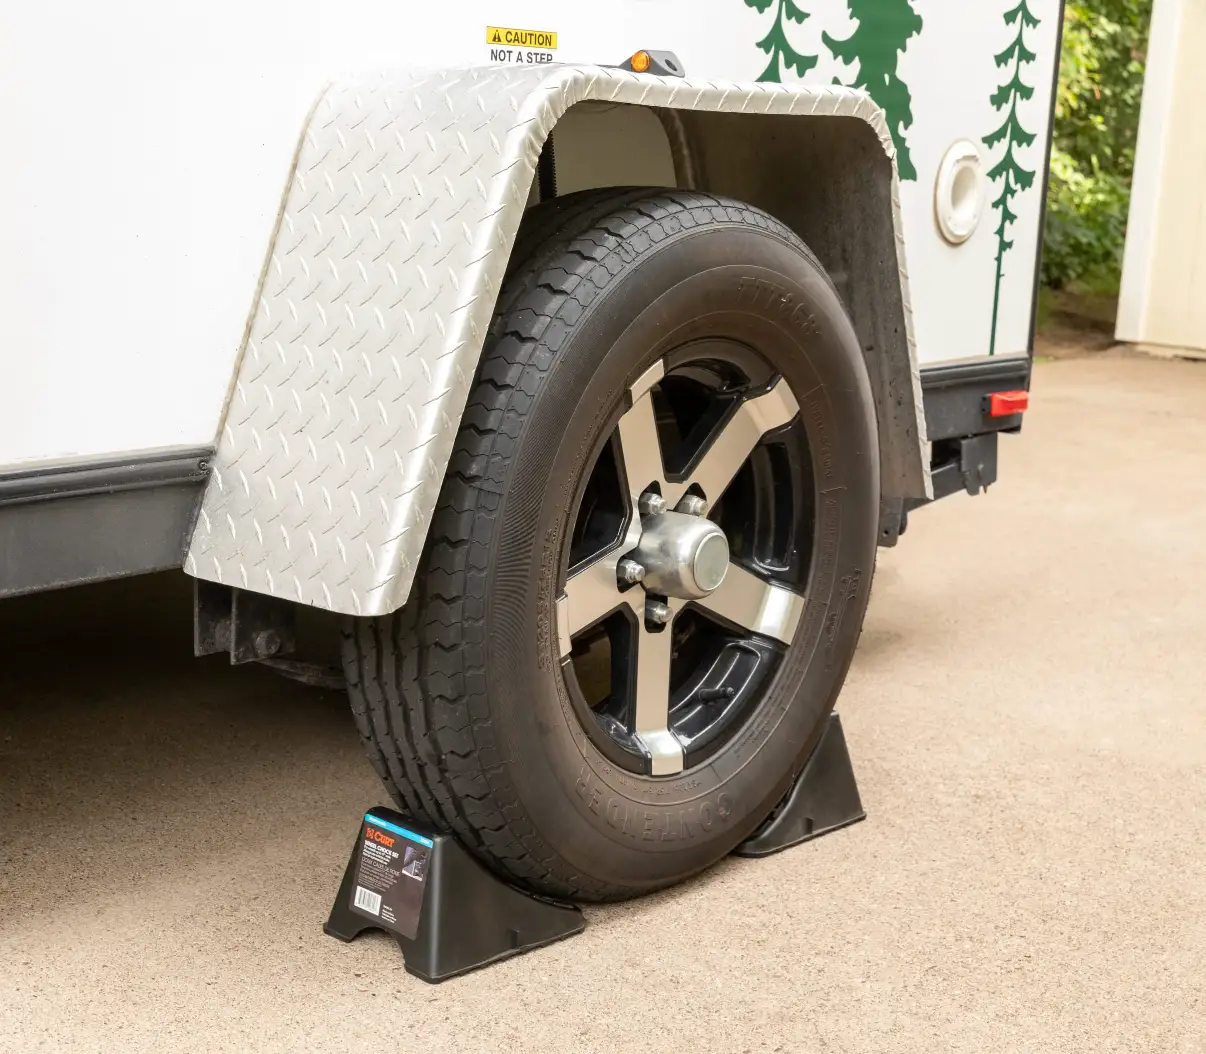

What are CURT HD wheel chocks?
CURT HD wheel chocks take trailer safety to the next level.
Similar to regular wheel chocks, these special, heavy-duty wheel chocks are placed on each side of the trailer tire. However, this is where regular wheel chocks are limited and the HD wheel chocks outshine.
The HD wheel chocks are made from a heavy rubber compound which means they will not slip or slide when weight is placed on them from the trailer. LIkewise, the rubber material provides exceptional traction during wet, slippery, or inclement weather.
Furthermore, the HD wheel chocks mount to your trailer frame, preventing the need to carry your wheel chocks inside your trailer or vehicle.
Learn more about CURT HD wheel chocks.
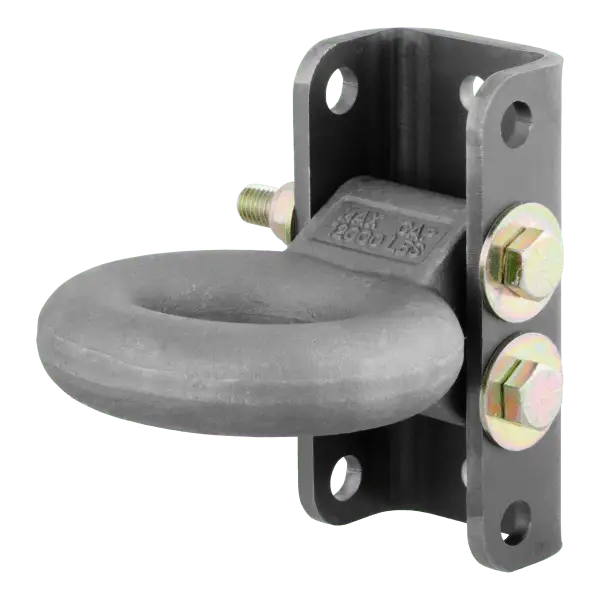
Trailer Safety Chains
A safety chain is a length of chain strong enough to keep the trailer from completely separating from the vehicle if it ever becomes disconnected while towing. Two safety chains should be used on every towing setup.
Safety chains are fixed to the trailer tongue and have hooks that allow them to be linked to a vehicle's trailer hitch.

Trailer Wiring Harnesses
A trailer wiring harness is a length of wire at the back of a vehicle that allows its electrical system to connect to a trailer. Integrated with the vehicle's existing wiring, it provides a standard connector, such as a 4-way flat plug.
A trailer wiring harness is one of the most vital towing parts but can often be overlooked. It supplies power to the trailer lights and synchronizes them with the vehicle's taillights. It can also be used to connect trailer brakes and auxiliary power.


Step 1: Remove Old Wires
Carefully take out the old wiring harness from your trailer, making sure not to damage any lights or components.
Step 2: Plan Wiring Route
Before installing new wires, decide on their path. Ensure they won’t get pinched or exposed to damage and are securely tucked under the vehicle.
Step 3: Install New Wires
Lay the new wires according to your plan, protecting them in a cable sleeve to shield them from the elements and debris.
Step 4: Connect Wires to Components
Attach the new wires to lights, brakes, and other parts. Be aware of the different wire colors and their functions.
Step 5: Ground the Wiring
Properly ground the wiring to the vehicle chassis or ground wire to avoid issues with functionality or electrical shorts.
Step 6: Test the Wiring
Check all lights and electrical parts to ensure they’re working correctly. Lights should be bright and responsive.
Step 7: Secure Any Loose Wires
Use zip ties or wire loom to fasten any dangling wires. Keep them away from moving parts or hot areas, ideally hidden under the vehicle.
Step 8: Final Check
Do a thorough inspection and test run. Ensure all lights, including brake lights and turn signals, work on both the tow vehicle and trailer. Retest after a few miles to confirm everything is stable for longer trips.


Trailer Winch
Definition: a trailer winch is a device that is mounted at the front of the trailer and is used to hoist heavy equipment, boats, UTVs or vehicles onto the trailer. A trailer winch is a hand-cranked device that pulls the winch strap towards the trailer coupler.
Trailer winches are common on boat and utility trailers. They are used to pull the boat up and onto the trailer while also working to keep the boat secure.
Trailer winches can also be used on utility trailers for securing equipment, pulling gear onto the trailer or even securing the gate of the trailer itself.
Before purchasing a winch be sure to choose the right size winch for the trailer and cargo you intend to tow.

